
January is a good time to get your setup going, if you want to try stocking your garden with seed-grown plants. For the next few posts, I’ll provide what experience has taught me.
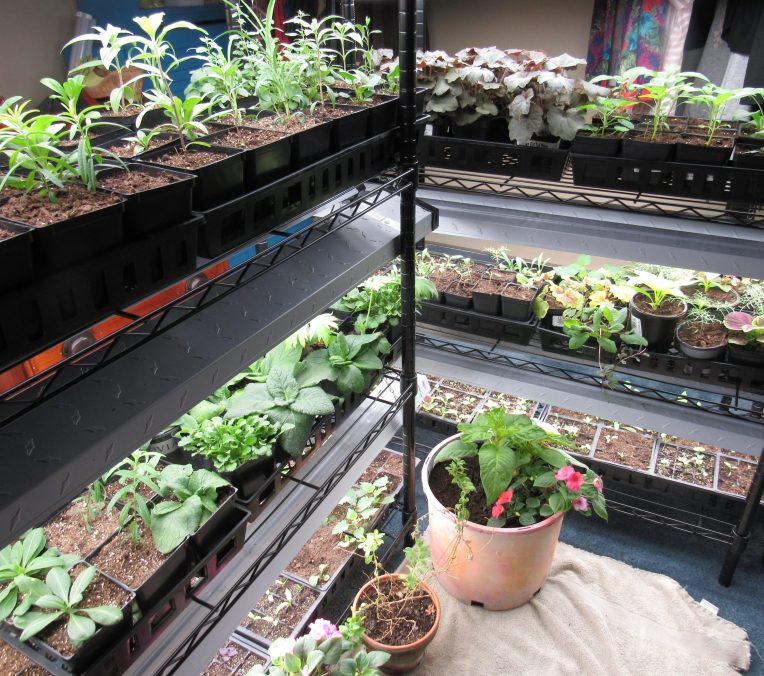
Any four-shelf unit really gives you three, unless you have a way of rigging lights above the topmost shelf; but this shelf makes a place to store your gear—spray bottles, pots, labels, etc. The ones I use are sold under the Amazon Basics brand, listed this year at 64.96, not including sales tax. They consist of wire shelves, hollow posts that screw together, and plastic fasteners that hold the shelves in place. They are not very trying to assemble, and also pretty attractive for use at other times as household furniture.
What you’ll want, if starting 500+ seeds (which sounds like a lot, but for any largish garden, is barely enough) is at least three sets of shelves. Each shelf can hold two flats, oriented short end to short end, for maximum exposure to light. When seedlings are large enough to be potted on (as in photo above), fewer will fit in a flat, and the shelves need spacing higher—the reason you need three units, instead of two.
For lights, daylight (blue-toned) LEDs work fine; I have not found any deficit in the light they provide to seedlings. The best choice is the shoplight type (at various stores, around $50 for a set of two), with two tubes per unit, and a four-foot length—and you’ll be happier if you buy lights that connect to one another, so that you have one cord per six lights in your surge protector, instead of a big tangle of cords. You can add up the wattage to be extra careful, but even three shelving units with eighteen lights altogether should fall well short of the load-capacity on a modern household plug.
Eighteen shoplights are a strong investment, true, but once you’ve purchased your seed-starting equipment, the cost-per-year over the lifetime of the equipment is reasonable, and even cheap. If you compare the cost of this same arrangement as sold by garden suppliers (as much as $300 for a two-shelf unit, or $1200 for four shelves), you’ll appreciate that a $700 (approx.) investment for three four-shelf units with lighting is a good bargain.
Any room with a door you can close against curious pets works as a growing room. I use a spare bedroom, and protect the carpet with drop cloths. Even LED bulbs will add heat to the room. I find I can’t use more than the three sets of shelf/light combos without the temp approaching the 80s (F), which is too stuffy for most outdoor plants, especially perennials. I move surplus maturing plants down to the garage. At this stage they’re fine, if not happier, in a cooler space, but if your seed-starting racks can only be in an unheated garage or porch, you’ll need heat mats.
The window of time for seedlings, from dropping the seed into the medium, to hardening off well-grown seedlings outdoors, should be about two months. This formula is usually calculated backwards from your local frost-free date, so that a May 5th date carries you to March 5th. But most perennials take longer than annuals to geminate; at the same time, the majority of perennials hardy in your zone can go in the garden earlier than the frost-free date, once hardened off (exposed to outdoor sunlight and wind until the leaves and roots toughen up). Exceptions are hibiscus and butterfly weed, both of which emerge from the ground after frost, and would be harmed if planted earlier.
(to be continued)

Good job! Helpful post for those just starting out.
LikeLike